
Member workflows
Follow the main MedBuk+ member journeys from a saved record to privacy-safe sharing and reward collection.
This page joins the screen guides into a few complete member journeys. The screenshots are from MedBuk+ version 1.8.0 with sample data. They are annotated reference screens, not fresh device acceptance evidence; labels and available controls can differ in the installed version. Use the individual screen guides for the full marker key.
Start here: sign in and set up (web app)
These screens are from the MedBuk+ web app at user.medbukplus.com, captured on 5 October 2026 with a sample account and sample answers. The phone app follows the same steps; its layout can differ slightly.
Sign in or create your account
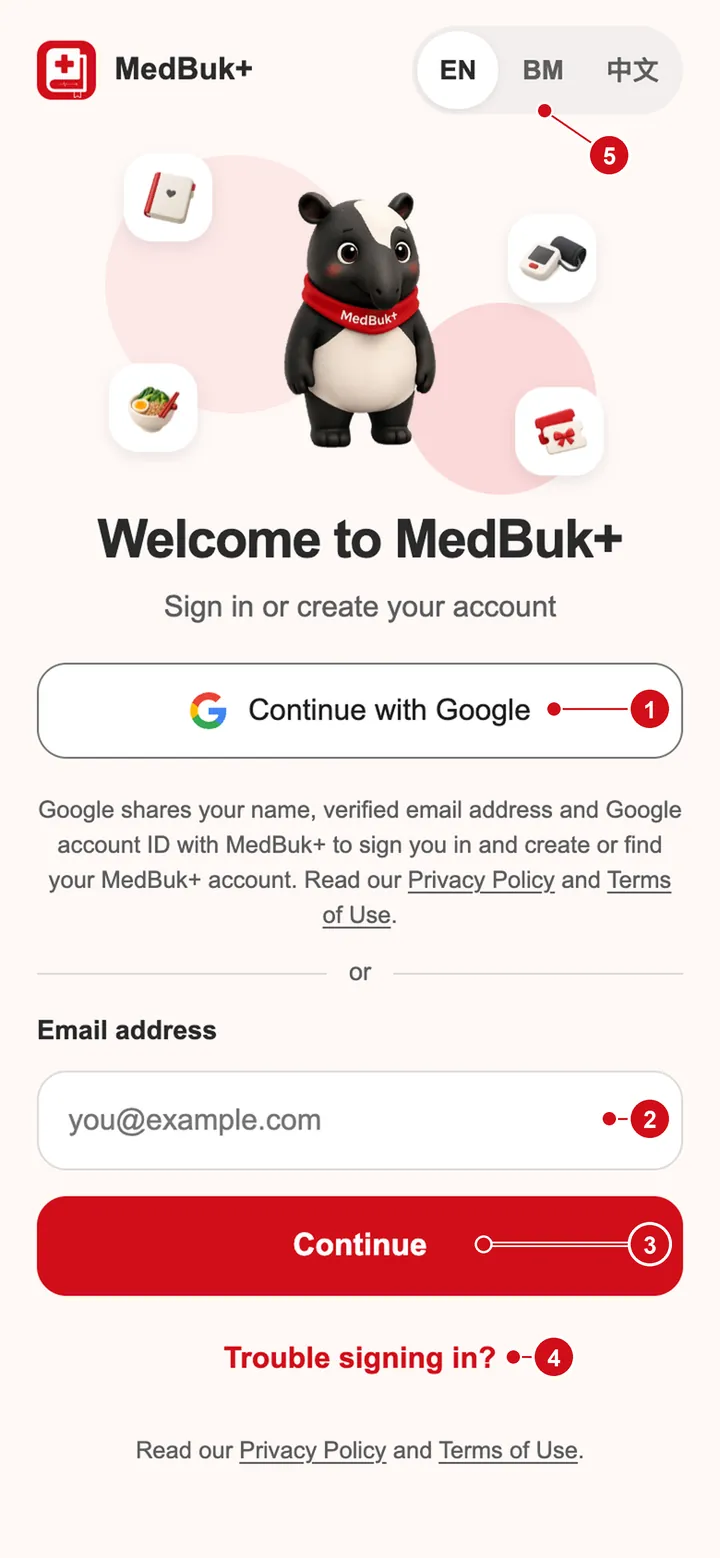
- Continue with Google signs you in, or creates your account, with your Google account.
- Email address: type the email you want to use. The same screen works for new and existing accounts.
- Continue emails you a six-digit code.
- Trouble signing in? opens help: try Google (or Apple in the phone app) if you used it before, try another email address, or contact support by email or WhatsApp. It never tells anyone whether an email address has an account.
- Choose EN, BM or 中文 at any time.
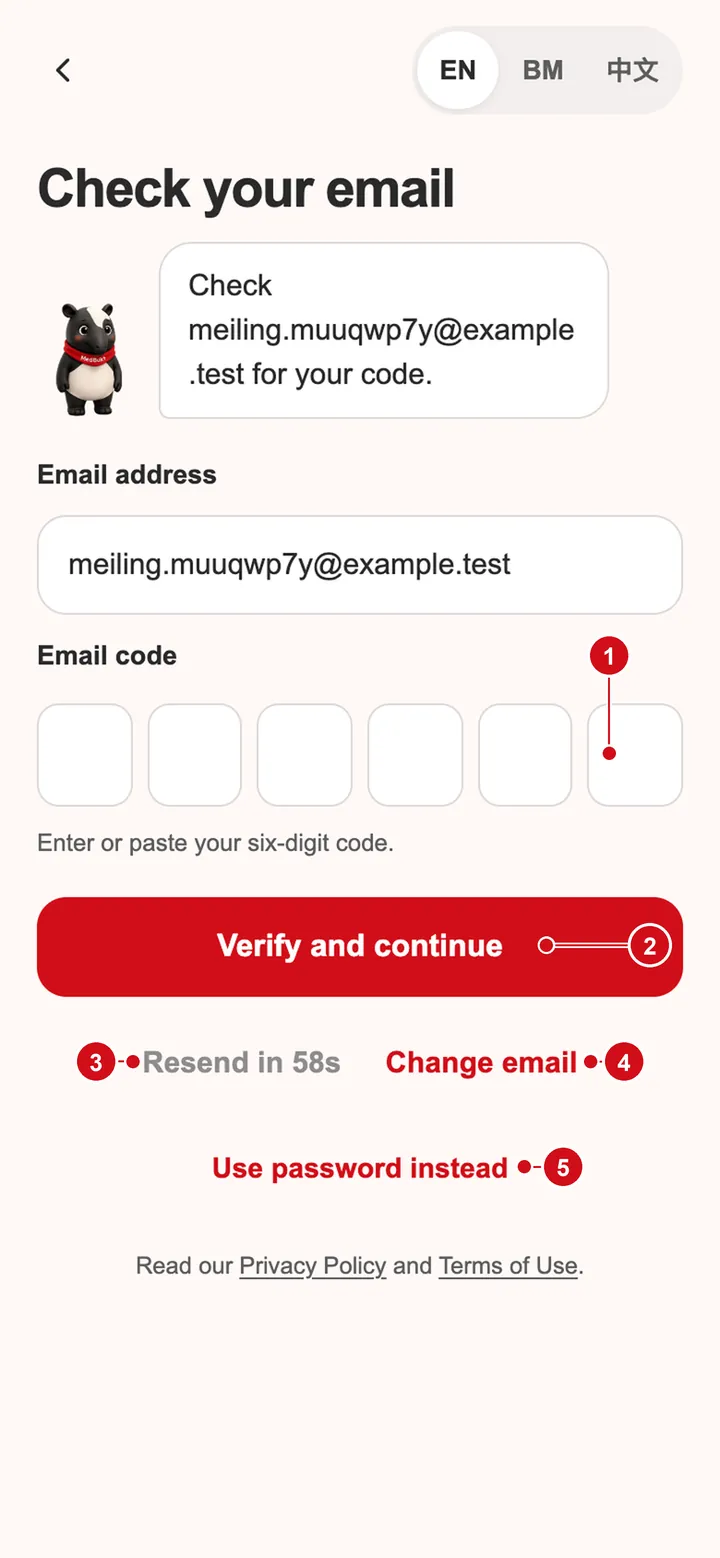
- Type or paste the six-digit code from your email. Use the newest code if you asked for more than one.
- Verify and continue.
- Resend becomes available after the timer runs out. Check your spam folder first.
- Change email if you typed the wrong address.
- Use password instead appears after a code is requested, for accounts that already have a password. Forgot password? on that screen emails you a code to set a new one.
If you cannot continue: wait for the timer and use the newest code. Never share a code with anyone, including support.
Set up with your buddy
The first time you sign in, your MedBuk+ buddy asks a few short questions. Setup runs once per account, not once per phone. You need to finish it before you reach Today.
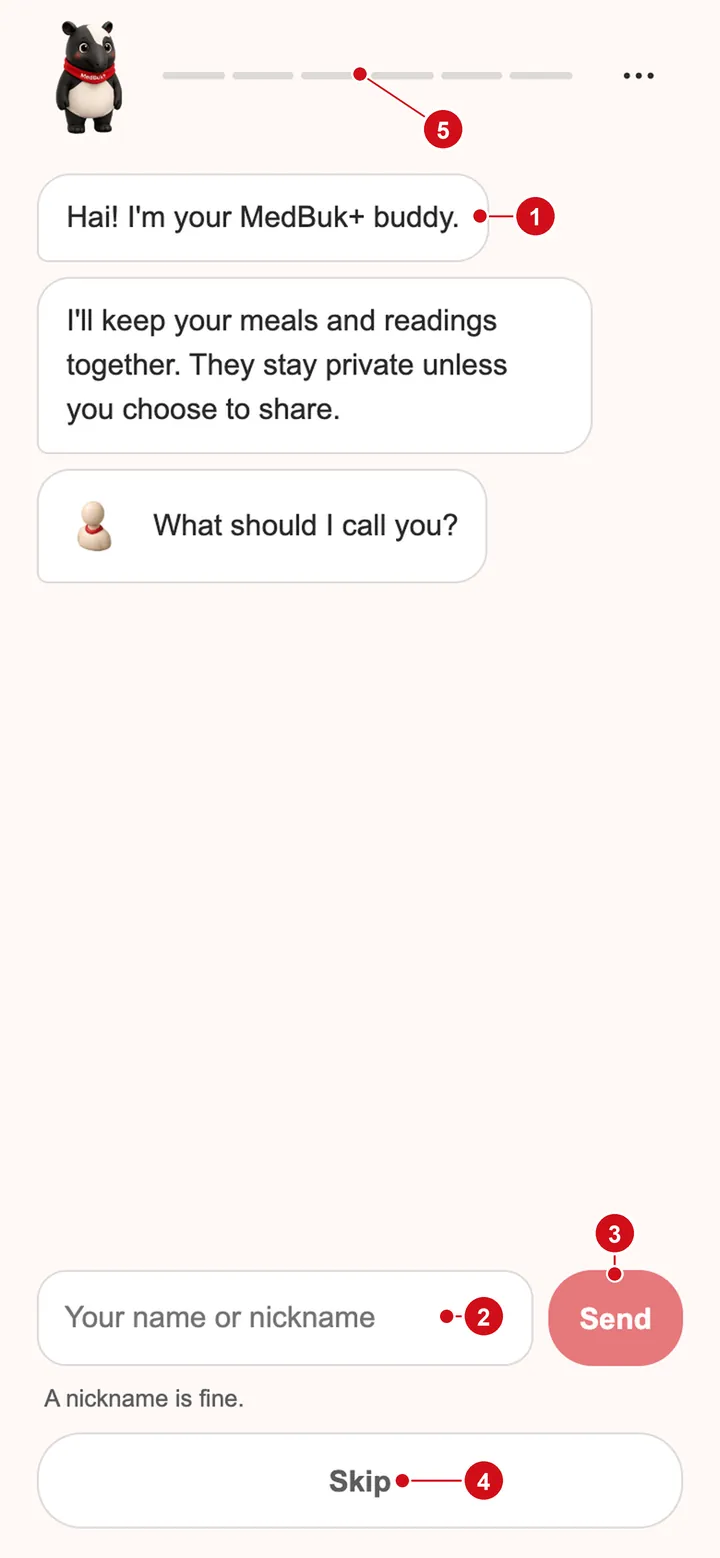
- Your buddy explains that your records stay private unless you choose to share them.
- Type the name or nickname you'd like to be called.
- Send.
- Skip if you'd rather not give a name.
- The bar at the top shows how far through setup you are.
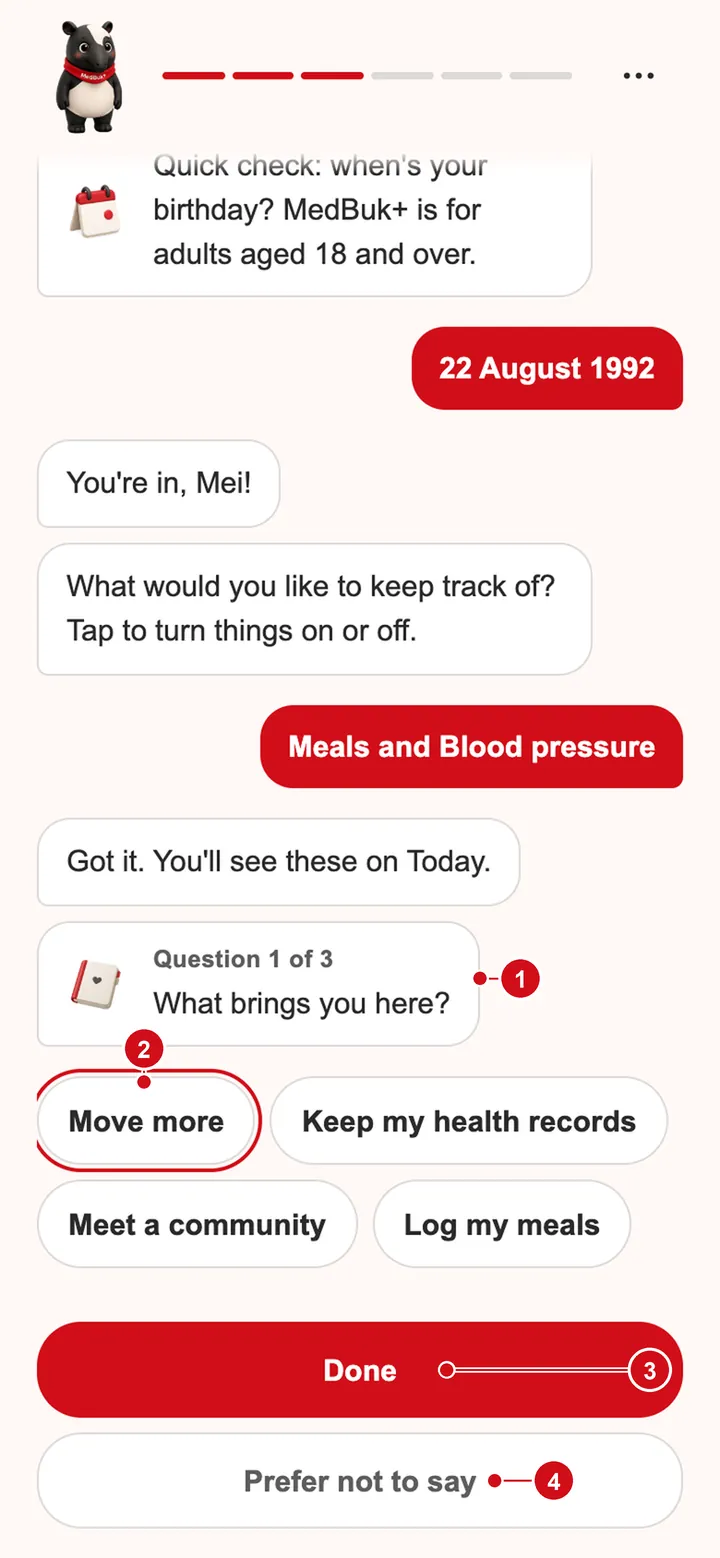
- Each question appears in the conversation. Setup also confirms you are 18 or over, and asks what you'd like to keep track of (for example meals, blood pressure or glucose).
- Tap one or more answers.
- Done sends your answer.
- Prefer not to say is available on every health question, and you still finish setup.
What you choose to keep track of decides what appears on Today and in Add. You can change it at any time in Settings → What I track. In the web app, Snap reads a meal, blood pressure or glucose photo whatever you track; you still review every value before it is saved. In the phone app, a reading you don't track may be refused with "This category is turned off in What I track": turn it on in Settings, then take a new photo.
Welcome gift and your first Today
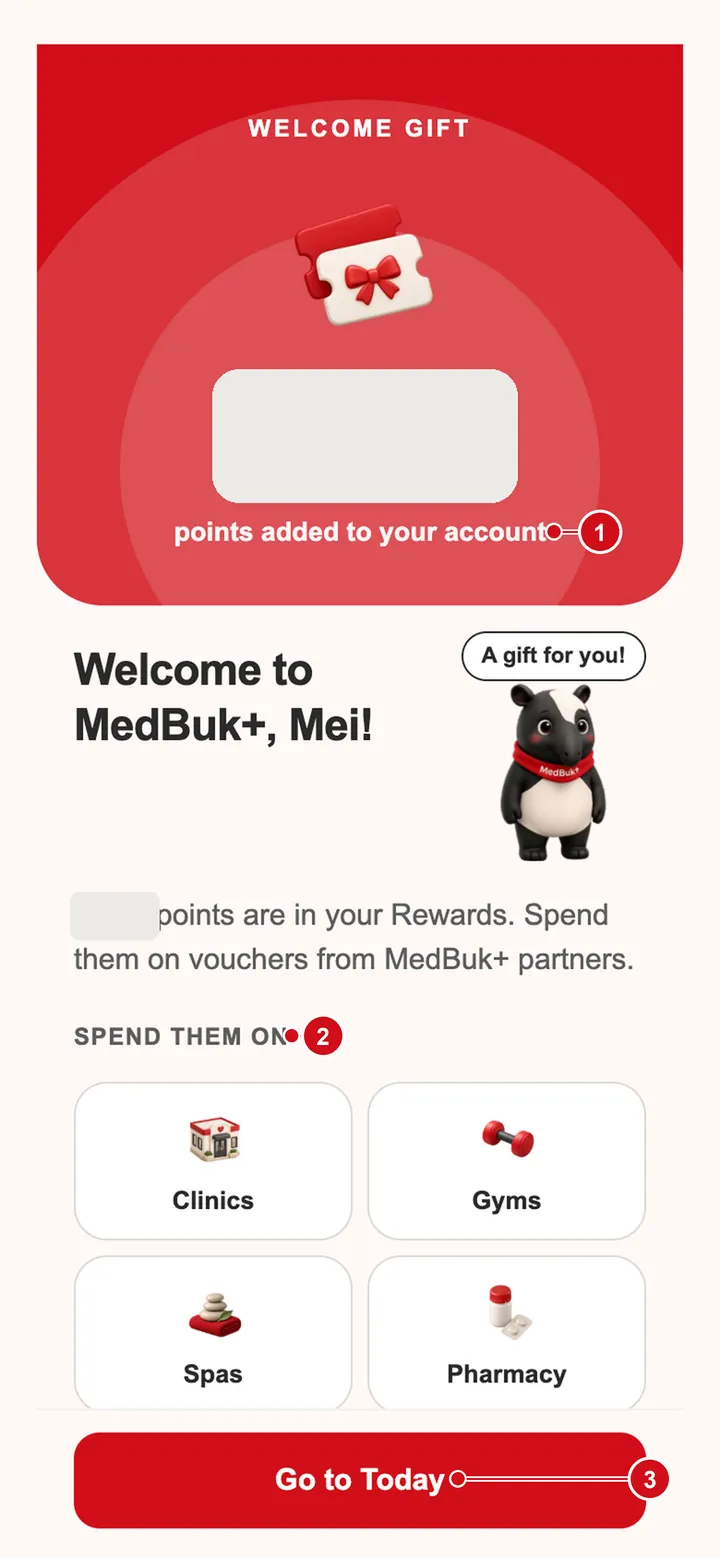
- Your welcome points are added to your account. The screen shows how many; the figure is hidden in this sample.
- Spend them on shows the kinds of partners where you can use points for vouchers.
- Go to Today.
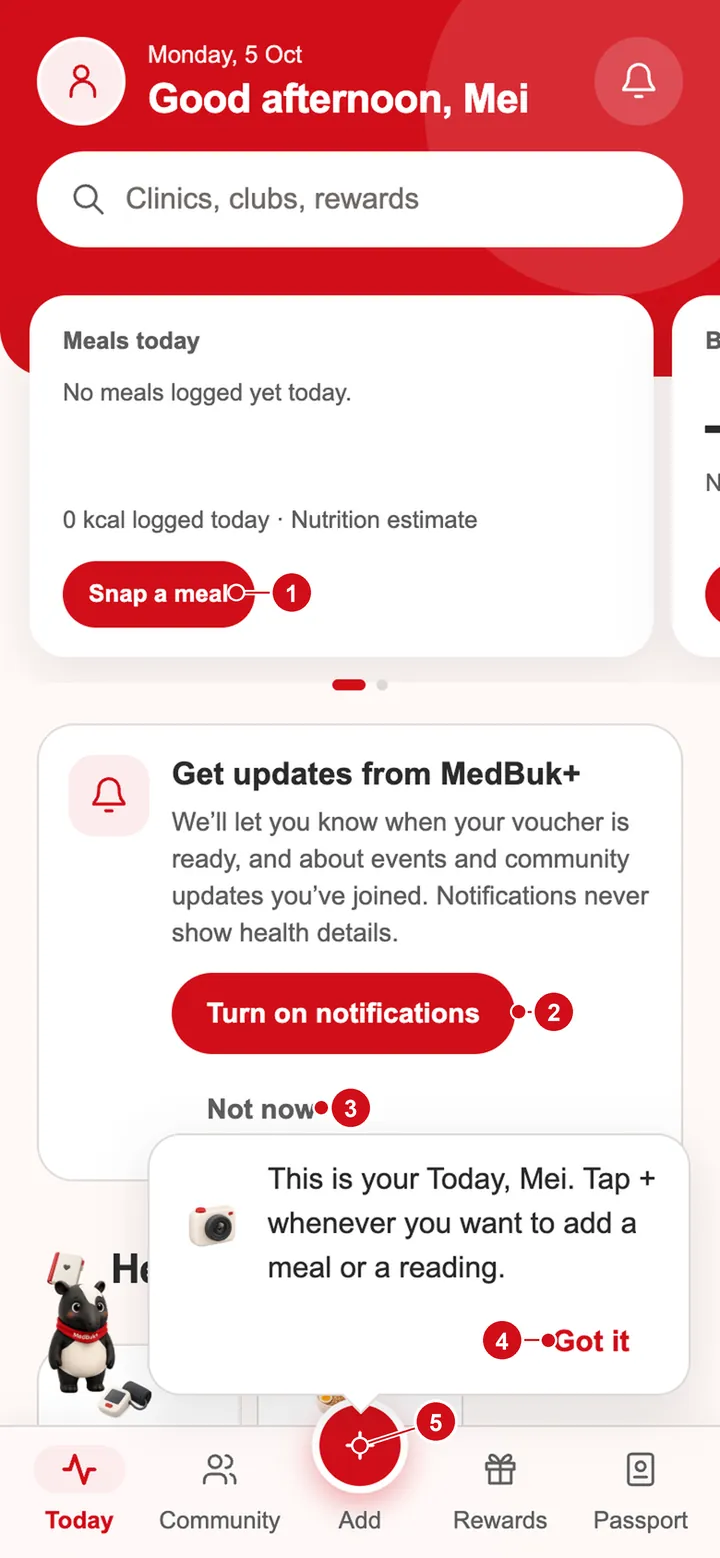
- Snap a meal opens the camera for a meal photo.
- Turn on notifications gets updates about vouchers, events you've joined and community news (never health details). Your browser asks for permission only when you tap it. On iPhone or iPad, add MedBuk+ to your Home Screen first.
- Not now hides the notifications card for seven days.
- Got it closes the one-time tip.
- Add (the red plus) records a meal or a reading at any time.
On the web app, a banner offers to Add MedBuk+ to your Home Screen. See using MedBuk+ in a browser.
1. Start on Today and open Add
- Open Today after signing in. Choose the red Add button in the middle of the bottom bar.
- On the Add sheet, choose a record type. For a manual reading, choose Blood pressure or Glucose under the typed-entry options.
- If a screen is empty or the button is unavailable, check that you are signed in and that the record type is enabled in Settings. A permission denial must leave the manual entry path available where the app supports it.
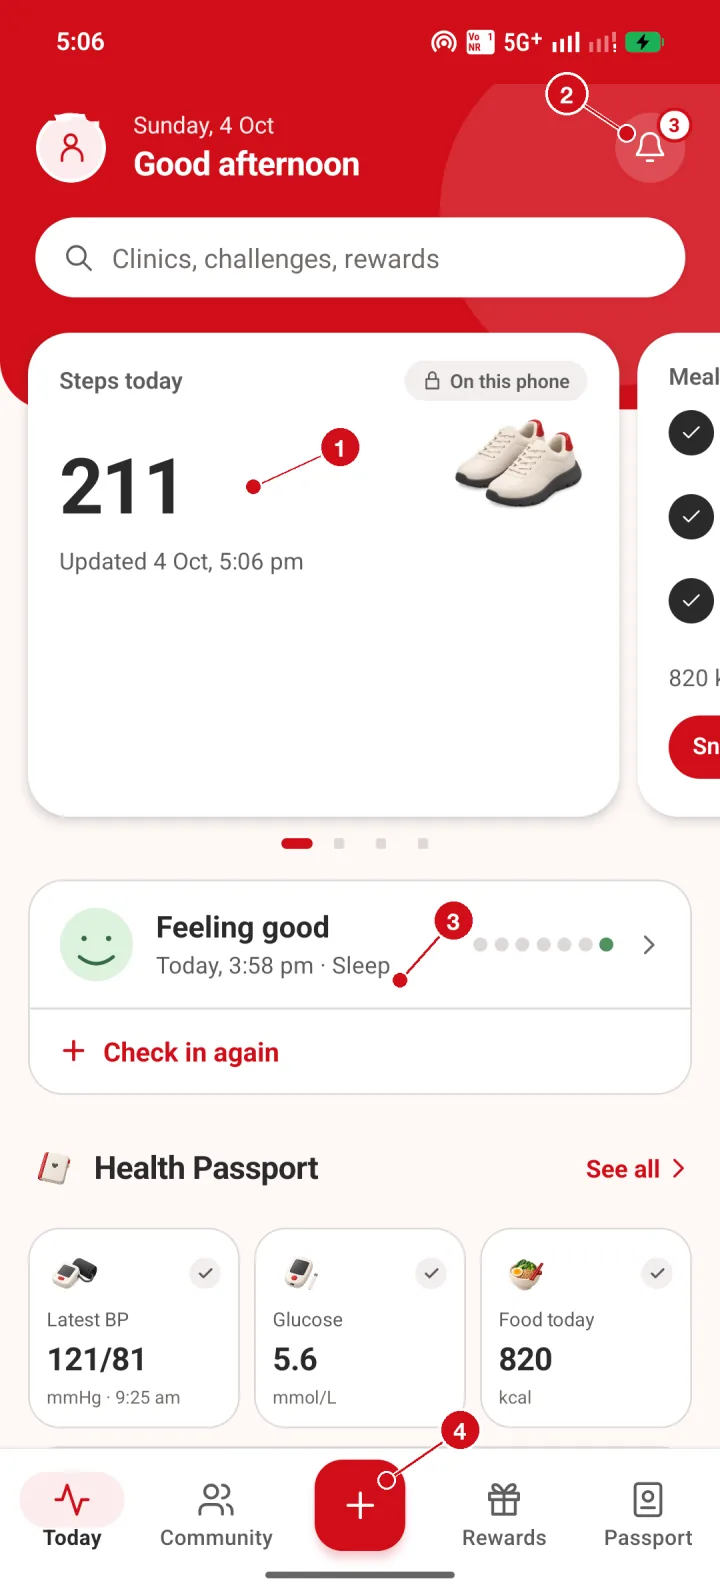
Marker 4 is Add. On the next screen, marker 2 is Type it in; markers 1 and 4 are photo and mood paths. See Today and logging meals and readings for the complete marker keys.
2. Enter, review and save a reading
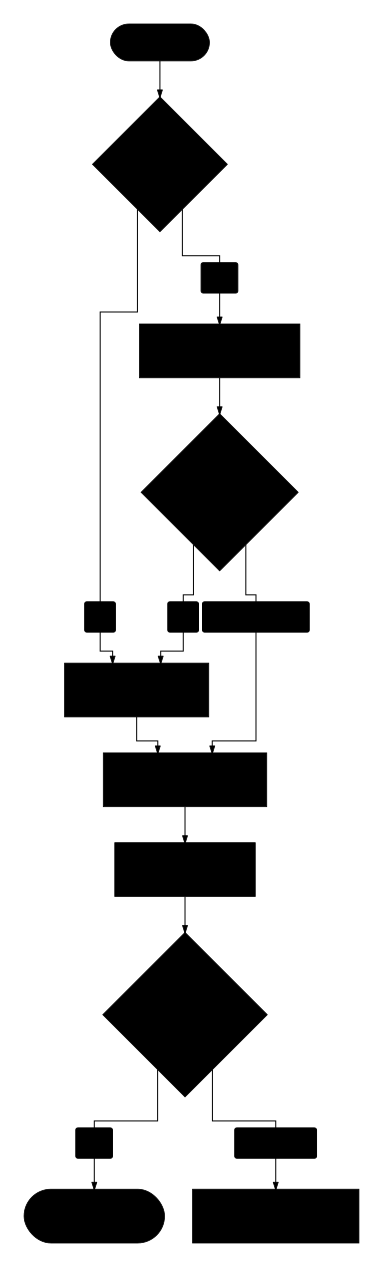
Read workflow as text
- Open Add and choose food, blood pressure or glucose.
- For a photo, read the processing notice and give consent before analysis; decline to use manual entry or food search.
- Review values, units, time, source and any estimate before confirming storage.
- Save only after the review; the result is a private Passport record.
- If saving is uncertain, keep the same attempt and check Records before retrying so a duplicate is not created.
- On the reading form, choose the unit shown by your monitor or meter.
- Enter the numbers exactly as shown. For blood pressure, enter systolic and diastolic; pulse is optional. For glucose, enter the displayed value.
- Choose when the reading was taken: Now, 1 hour ago or Pick time where offered. MedBuk+ records the value and does not interpret it.
- Review the value, unit and time, then tap Save to my passport. A draft from a photo is an estimate and still needs your review; no draft is saved silently.
- If a required value is missing, Save remains unavailable or inactive. If saving fails or the result is uncertain, keep the entered draft and check the Passport when connected before repeating the entry.
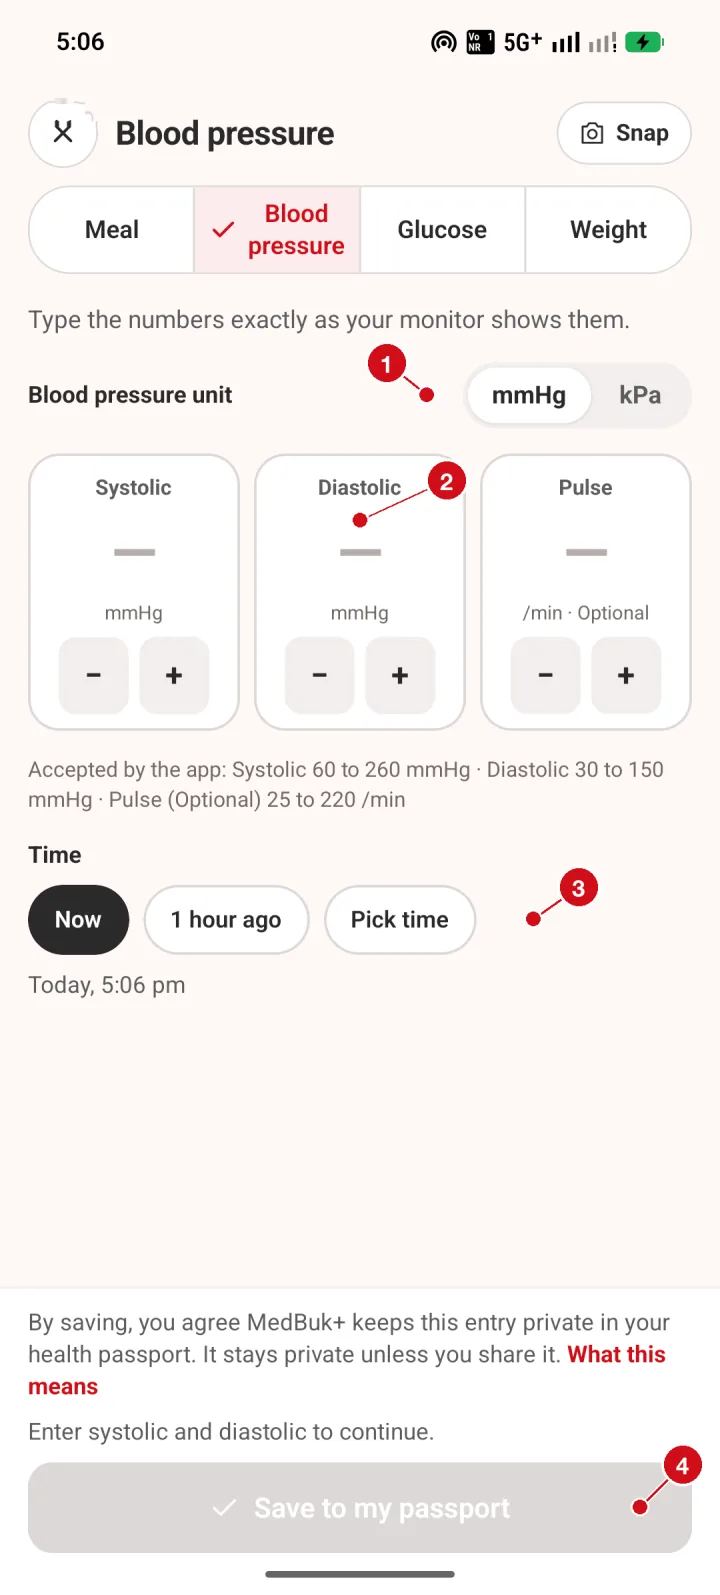
Markers 1–4 are the unit, reading boxes, time and Save to my passport.
The Android annotated guide also shows the documented saved confirmation at
/guide/android/07-save-celebration.webp; that confirmation asset is Android-only in this
guide.
3. Verify the saved record in Passport
- Open Passport in the bottom navigation, or choose Health Passport from your profile where offered.
- Check the latest record in the timeline. Confirm the value, unit, time and how it was recorded. A label such as Entered by you or an estimate label describes provenance; it is not a medical interpretation.
- Open the record for details if needed. You can hide it from the main timeline; hidden entries remain under Hidden records.
- If the record is absent, first refresh and check the selected account and timeline filters. Do not create a duplicate while the first save has an unknown outcome.
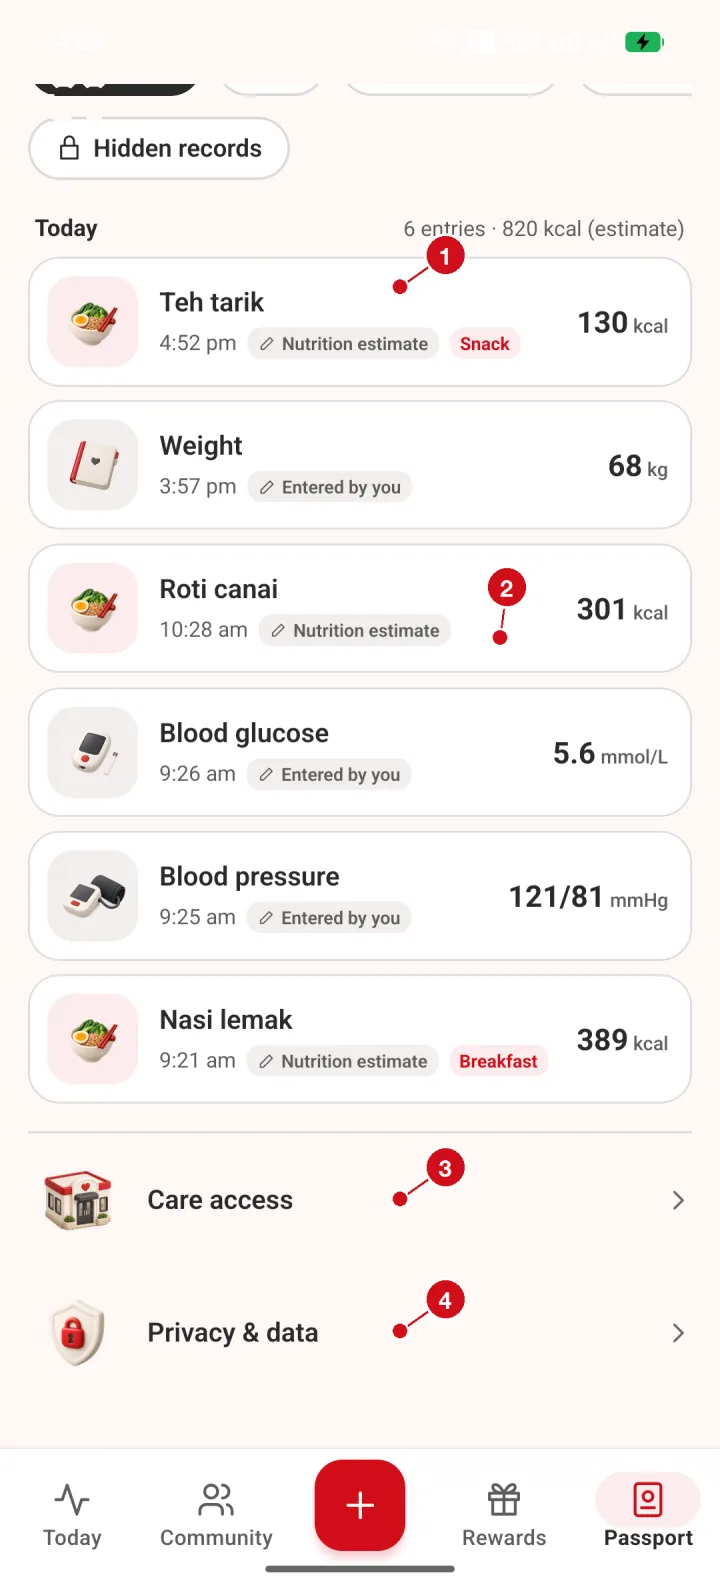
Marker 1 opens an entry, marker 2 explains how it was recorded, marker 3 opens care access, and marker 4 opens Privacy and data.
4. Claim a voucher and present it to the partner
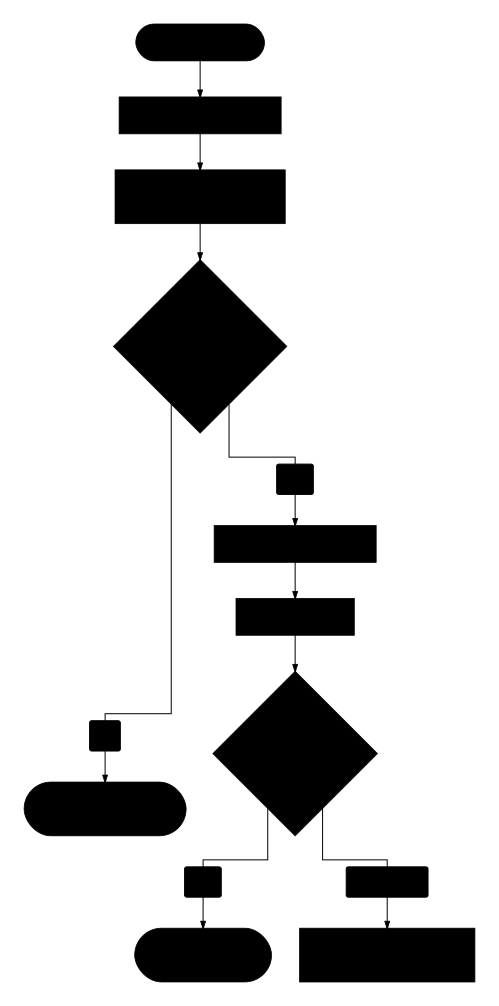
Read workflow as text
- Open Rewards and select a published offer.
- Read the exact benefit, eligibility, exclusions, approved outlet, dates and current stock.
- If the claim window, stock or eligibility is invalid, wait or refresh; no claim is guaranteed.
- Accept the reward rules and choose Claim reward.
- Check the confirmed claim and reservation expiry, then keep the QR or short code private.
- If the result is unclear, refresh the same account and check for the existing claim before trying again.
- Open Rewards, read the exact benefit, eligibility, exclusions, approved outlet and expiry, then select the rule-acceptance checkbox.
- Tap Claim reward and check the resulting claim and reservation expiry. A campaign may be empty, out of stock, outside its claim window or unavailable; refreshing cannot create an offer.
- Open My vouchers and choose the active claim. At collection, show the partner only the short-lived QR or fallback code. Keep the code private.
- The partner verifies the code and confirms Ready to redeem. For a free benefit, they confirm delivery; for a discount, they confirm the discount and you pay any remaining bill directly. Wait for the confirmed redemption result.
- If the QR has expired, refresh the claim or use the still-valid short code. If the network or result is unclear, do not ask the partner to issue the benefit twice; refresh and check the latest status. See the merchant collection guide for the staff-side verification steps.
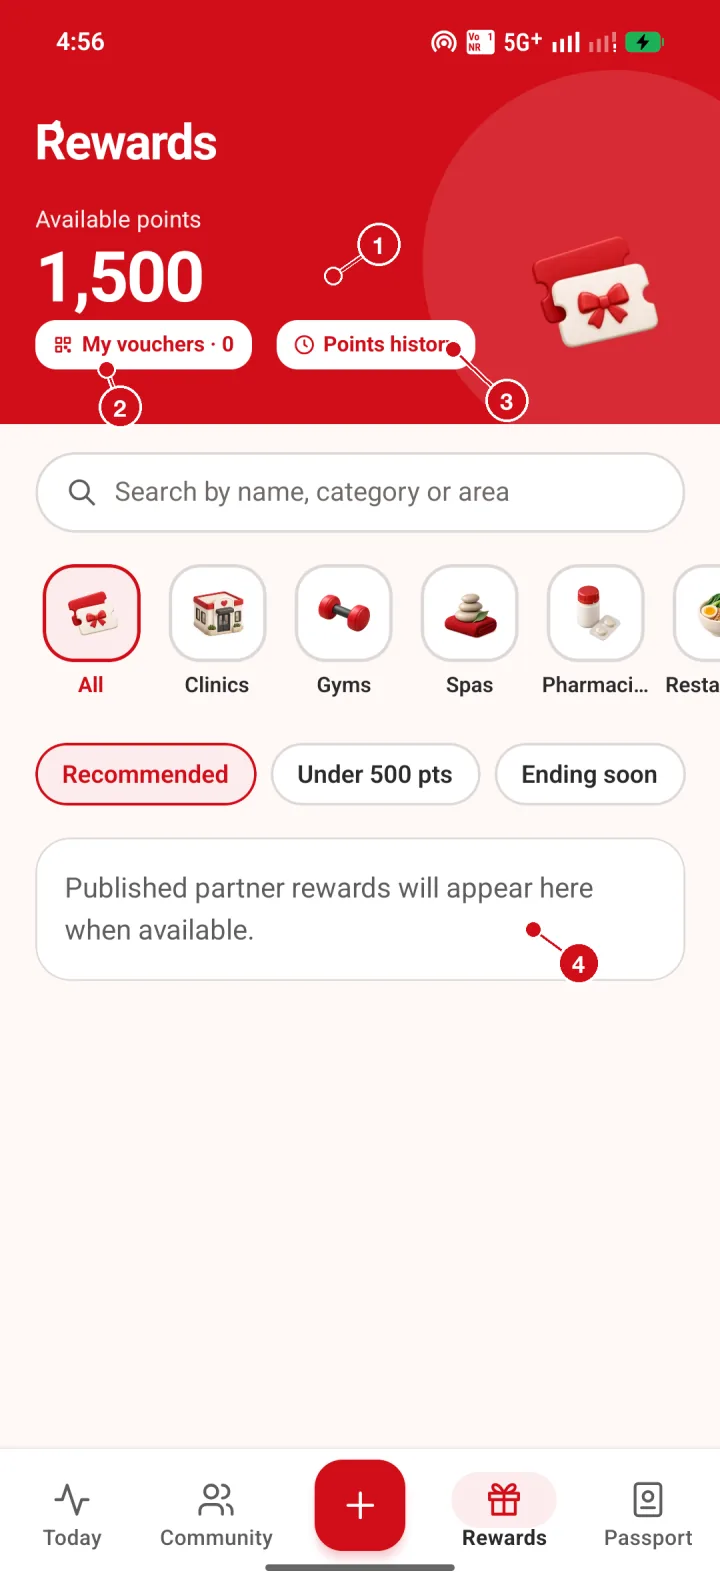
Marker 2 opens My vouchers. The separate My vouchers screenshot uses marker 1 for the empty state and marker 2 for Back; an empty sample screen is not proof that a claim exists.
5. Browse Community and join with privacy in mind
- Open Community, then choose Clubs or Challenges. Use filters to narrow the list and open a card to read its details.
- Read what will be shared, the dates and the participation rules before choosing Join. Joining a club or challenge does not grant access to your Health Passport.
- Use Leave when you want to stop participating. A joined badge or progress total is a state returned by the service; the reference screenshots below show browsing and details, not a fabricated join confirmation.
- If the list is empty, filtered empty or offline, clear the filter or retry. If joining returns an unknown result, refresh the detail screen before trying again so a duplicate membership is not created.
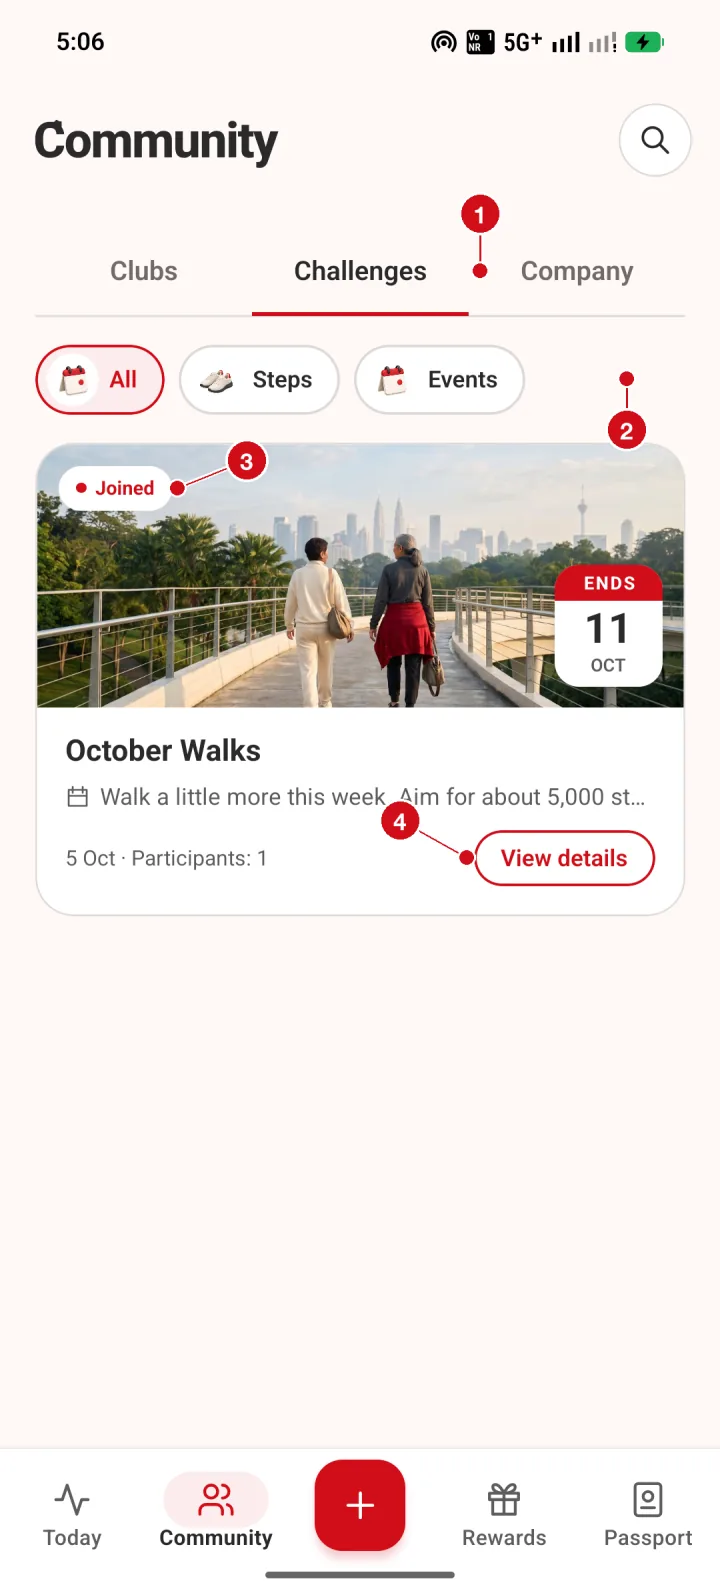
Markers 1–4 are Clubs, Challenges, Company, filters, the Joined state and View details. The detail view documents the rules, provisional progress and Leave action.
6. Recover through Settings, privacy and help
- Open your profile, then Settings. Use Settings for language, tracking, units, reminders and notifications; changing a display unit does not alter a saved value.
- Open Privacy & policies to review health storage, community privacy and photo analysis notices. Open Privacy & data for download and account controls.
- For a failed download or sharing action, retry from the same control and check the resulting file or share sheet. Do not treat a button press as proof that data was sent.
- Open Help & support for account or app assistance. For medical questions, contact a doctor or nurse. If a session has expired, sign in again and retry the original action; do not share passwords, invitation links or voucher codes with support.
Use the detailed Settings, privacy and your data and Getting help pages for the existing Android and iPhone marker keys. Account deletion and its private receipt are covered by Account privacy and deletion.